//NEW Science is Fun!

Even a Dollar you Donate Will help the Authors

Grow or shrink an egg (Is it magic!?!)

MATERIALS : 2 ping pong eggs (See the writing Ping pong egg! ) 2 transparent glasses or containers where at least one egg will fit ...

Sunday, 27 January 2013

Invisible ink – 1


MATERIALS:

1. One tablespoon of cornstarch
2. A cup of water
3. A paintbrush
4. Paper
5. A piece of cotton
6. One tablespoon of iodine tincture mixed in a cup of water (Warning: Direct contact with this chemical can be harmful)


INSTRUCTIONS:

1. Mix the cornstarch in a cup of water very well.
2. Dip the paintbrush in the cornstarch mixer. Now use the paintbrush to write something on the paper. (Usually it’s a secret message because the writing is invisible! :p)
3. Let the secret message/invisible ink dry on the paper.
4. Now dip the piece of cotton in the iodine tincture solution and then rub the paper with that cotton.
5. Now observe what happens.

RESULT:

The invisible or secret message you wrote on the piece of paper should not be so secret anymore! It should appear on the paper in dark purple letters.

EXPLANATION:

Normally iodine has dark red color. But when iodine comes in contact with starch, its color changes to a dark purple color. Different kinds of foods such as rice, potatoes etc. contains a great amount of starch. You can find out that whether a food have starch or not by adding only a drop of iodine to them. In our experiment we used cornstarch solution to write invisible or secret messages. By using cornstarch on the paper we provided the paper a source of starch which can be tested by iodine. The area of the paper which contains starch becomes dark purple after adding iodine tincture on them. This is how you would be able to create and read your invisible or secret messages. And you can do all of this just by using a simple chemistry!

MORE EXPERIMENTS FOR YOU:

1. Blend a little bit rice in the water and use it instead of cornstarch solution to see what happens.
2. Blend a really small piece of potato and use it instead of cornstarch solution to see what happens.
3. Try some other foods instead of cornstarch to see what happens. To do this you can first be sure if that food has starch or not by adding a drop of iodine on it.
Saturday, 26 January 2013

Create an easy prism


MATERIALS:

1. A transparent or glass bowl
2. Some fresh water
3. A small mirror
4. Sunlight

INSTRUCTIONS:

1. At first put some fresh water in the transparent bowl.
2. Then place the small mirror inside the bowl under the water.
3. Finally put the bowl on a place where sunlight will strike the mirror inside the bowl.
4. Now observe what happens.

RESULT:

You will see that the reflected sunlight has created a really beautiful spectrum of colors.

EXPLANATION:

We know that when light enters from one transparent medium to another transparent medium it bends on the boundary of those two mediums. The amount of bending depends on the nature of the mediums and also the color of the light. The white light of the sun is the sum of seven different basic colors. In vacuum, all colors of lights have the same speed, but in a medium different colors of lights have different speed. For example, red light is 1.8 times faster than violet light. Due to the difference of speed among the different colors of lights a spectrum is created when light comes through one transparent medium to another transparent medium. So we can say that, due to the composition of different colors in the sunlight light disperse and a spectrum is created.

MORE EXPLANATIONS:

In 1666 Sir Isaac Newton first came proved about the dispersion of light through a very easy and yet important experiment. He poke a hole on his window. In his dark room sunlight came through that hole and strike upon the wall. Then he placed a prism on the path of the light ray. Then he saw seven different colors of light instead of only white color of the sunlight. These seven colors are – violet, indigo, blue, green, yellow, orange and last but not least red. Sir Isaac Newton saw these seven colors one after another. Today to remember the name of the colors serially they were named VIBGYOR. Each of the seven characters of this word VIBGYOR is actually the first character of one of the seven colors. These seven colors are the basic colors and all the other colors of the world is the composition of two or more of these colors.

MORE EXPERIMENTS FOR YOU:

1. Use torch light instead of sunlight to see what happens.
2. Use the full moon light to see what happens.
3. Use red, blue or any other color of light instead of white light to see what happens.

Wednesday, 23 January 2013

Create liquid light!


MATERIALS:

1. A big tin can or a plastic pot (The pot must not be transparent or semi-transparent)
2. Some fresh water
3. A torch light
4. A dark room (Not necessarily the dark room for developing films just a room with less light)

INSTRUCTIONS:

1. At first put some water in the tin can or pot. Fill it to the brim.
2. Now poke a small hole on the side of the can or pot. Make the hole on the lower middle part of the pot.
3. After that open the top of the can and aim the light of a torch light on the water.
4. Now observe what happens.

RESULT:

1. When you poke a hole on the side of the tin can or pot the water inside the pot starts to leak out with a certain amount of flow.
2. When you aim the torch light inside the tin can you will see that the water which is leaking out is looking like a curved ray of light.

EXPLANATION:
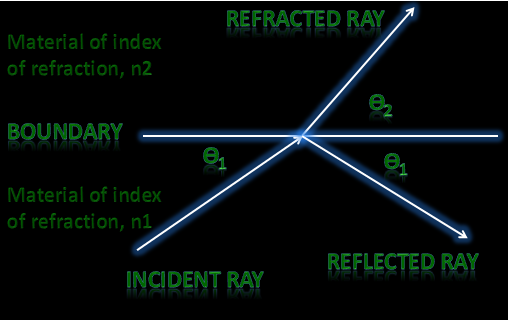
Reflected and refracted light at a boundary of differing index of refraction

We know that light ray always travels in a straight path. But in this experiment it looks like that light ray is travelling in a curved path. How is that possible?! This is possible because of a law of physics which is called total internal reflection. The light of the torch which was aimed inside the tin can is trapped within the flow of the water because of the total internal reflection. And because of that light is also curved along with the curved water. Some low amount of light refracts outside the flow of the water which makes the water look something like liquid light!


MORE EXPLANATIONS:

When the light strikes the boundary between two transparent or semi-transparent materials of different indices of refraction, the path of the light ray is altered into two different ways. At first the light is reflected. So the light energy which is reflected does not enter the material at the other side of the boundary. The remaining light energy does not enter the material but the path of the light ray is altered.

[From – Modern Electronic instrumentation and Measurement Techniques, Fifth Indian Reprint, Chapter 14 – fiber Optics Measurements, Page – 419, Writers- Albert D. Helfrick and William D. Cooper]

MORE EXPERIMENTS FOR YOU:

1. Try the experiment both in hot and cold water.
2. Use vinegar instead of water.
3. Use oil instead of water.
4. Try adding soap in the water.

Boiling Water on Paper Cup!


MATERIALS:

1. A paper cup (The paper should be a bit thick)
2. Some water
3. A burner or a candle

INSTRUCTIONS:

1. At first put some water in the paper cup. It would be best if you put fresh water in the cup for the initial experiment.
2. Now hold the cup on top of the burner or candle or something that can be used to boil the water inside the paper.
3. Now turn on the burner or fire up the candle.
4. Careful not to let the fire to be very close to the edge of the paper cup.
5. Now observe what happens.

RESULT:

You will see that the amount of heat which was supposed to burn the paper cup didn’t burn it at all! And also the water has boiled after waiting up a few minutes with the heater turned on.

EXPLANATION:

To burn something three basic elements are needed. These are - Burning material (which is the paper cup), Oxygen and Heat or temperature.

In this experiment the first two elements burning material (which is the paper cup) and Oxygen are present. But heat is absent. But how is it possible that heat is absent? I mean heat is constantly being given to the paper cup by the burner! Well it’s because the heat given by the burner is absorbed by the water inside the paper cup. That’s why the paper cup isn’t getting the necessary heat to be burned. And in the meanwhile if you wait up a bit longer the water will boil as well.

MORE EXPERIMENTS FOR YOU:

1. Try to make a boiled egg through this experiment
2. See if you can cook anything using this experiment. But be extremely careful. Try it on a small scale at first.

Fire in the water!

A candle
A candle


MATERIALS :

1. A candle (Should be small but thick)
2. A bowl
3. Some water
A bowl
A bowl

INSTRUCTIONS :

1. First put the candle inside the bowl. Make sure that the candle stays standing inside the bowl.
2. Now pour some water into the bowl and fill it just right under the top of the candle so that it can be put on fire.
3. Now observe what happens.

RESULT :
A candle in a bowl
Fire in water
You will surprisingly see that the candle didn’t go out even when its top is lower than the water level.

EXPLANATION :

When the candle is light it starts to melt down. The melted liquid wax is lighter than the water. So it floats on the water. When the melted liquid wax touches the water it becomes solid again because the water is cooler than the liquid candle. The heat in the liquid wax transfers to the water when it touches the water and hence it becomes solid again. With this process a thin layer of wax is created in the water. The longer the candle is on fire the more this layer will produce. This layer will work like a dam or a wall and prevent the water from coming inside the wax layer. That’s why the candle will light until the end.

MORE EXPERIMENTS FOR YOU :

1. Try this experiment using hot boiled water (100 degrees temperature).
2. Try the experiment using multiple candles in one bowl.
Flag Counter